A8. How Can I Select Services for Preliminary Cost Statements (Invoice Proposal)?

From time to time, you may want to print a preliminary statement of your services in a case. You can use the printer button in the case list (area "Finances") to do just that. If you only want to print a selected number of services, temporarily hide some services:

  • Open the case to see all services. Select the services that you do not want to show up on your preliminary statement of costs. At the bottom right, click the action menu (gear wheel) and select "Hide selected services".
  • Go to your case list ("Finances", "Cases") and select the case. At the bottom right, click the printer symbol and choose "Invoice Proposal Details". Hidden services will not show up on the document.
  • To make hidden services reappear, just click the button labelled "Show" in the case's time sheet.

A7. How Can I Use a Dictation Software with 4D Write Templates?

In order to use a dictation software to dictate in 4D Write, you need to open a specific dictation window.

Hit the keys SHIFT + CMD + "D" to open an empty window on top of your 4D Write window.

Dictate your text in this window and transfer the text into your 4D Write template using the "Overtake" button. The dictation window has been tested with Dragon Dictate and with the Mac OS X integrated Dictation feature.

Follow this link to find out more about Dragon Dictate: http://www.nuance.com/for-individuals/by-product/dragon-for-mac/software/index.htm

Follow this link to find out more about Mac OS X Dictation: https://support.apple.com/HT202584


A6. Does timeSensor® LEGAL Support vCard?

timeSensor® LEGAL supports the import and export of contacts in the  vCard format 2.1 and 3.0.

Import vCards

A vCard may contain one or several contacts. To import it, you can drag&drop it from your desktop (or another folder), or use the command "Import vCard" in the "Tools" menu. You cannot drag&drop directly from the Apple Contacts.

Import a Single Contact

To import a single contact from a vCard, drag&drop it directly into a new dossier window. It is best to drop the vCard on the "label field" of the dossier window. Alternatively, you can also drop the vCard on a contact list window. An import dialog box will open that lets you import the vCard.


Import Several Contacts

To import a vCard with several contacts, drag&drop the file directly into an open contact window. The dialog box that opens will let you add additional information before importing the new contacts. At the end, the newly imported contacts will show up in the address window.


Export several contacts

Use the command "Export vCard" in the "Tools" menu to export several contacts. timeSensor® LEGAL will create a vCard 3.0 file, which can then be used by other software.

Adding One or Several Contacts to Your Apple Contacts

The "Contacts" button at the bottom of the contacts window lets you export the selected contacts to vCard and transfer them to your contacts with a single operation. The vCard contains an invisible identifier (UUID), which allows Apple Contacts to verify the contact and, if it is already in your contacts, update it.

Make sure that timeSensor® LEGAL can access Contacts if you want to add contacts from timeSensor® LEGAL to your Apple Contacts. Check the corresponding box in your system preferences, under "Security & Privacy", "Privacy", "Contacts".


Automation and iPhone Sync

Set up a local background task to force timeSensor® LEGAL to update your local contacts automatically. Every time you add or update a contact in timeSensor® LEGAL, the background task will automatically update your local contacts. You can then sync your local contacts with your iPhone using iCloud. This will make your timeSensor® LEGAL contacts directly available on your iPhone.

Follow these three steps to set it up:


  • Make sure that all of your local contacts from your Apple Contacts have been imported into timeSensor® LEGAL. Use the import feature in timeSensor® LEGAL to do that.
  • Delete all entries from your Apple Contacts.
  • Configure a background task that updates your Apple Contacts automatically. Your contacts will then again show up in your Apple Contacts and on your iPhone.


To set up a background task, go to "Settings", "Admin", and select "Background Tasks" (admin rights required). It might be wise to exclude some types of contacts from the background export task. If you're located in Germany, you may not want to sync the entire court contacts to your iPhone.

A5. How Can I Import Contacts from Excel into timeSensor® LEGAL?

Follow these five steps to import contacts from Excel into  timeSensor® LEGAL.

  1. Prepare your contacts in Excel and save them as a tab delimited text file (.txt).
  2. In timeSensor® LEGAL, go to "Contacts". In the "Tools" menu, select "Import", then "Import Records...".
  3. In the dialog box "Import Table", click "Import" to select the Excel file.
  4. Adapt the title in the table and click the button "Import". You must assign a field to each column in the Excel spreadsheet.
  5. Check the table, then click "Next". Specify the contact type, and if necessary other options, before clicking "Create".

This will import all contacts into timeSensor® LEGAL.

Excel Template to Facilitate Import

We have created an Excel template "FAQ Default" to facilitate your work: FAQ Default

Enter your data in the correct columns and use the import filter "FAQ Default" to import all data into timeSensor® LEGAL. The model entries in the template are examples and can be deleted. You do not need to fill all columns. timeSensor LEGAL will try to supplement any missing information.

A4. How Can I Create a Collective Invoice?

When a client has several cases, you may want to enter services in each case individually, but create a collective invoice. To do this, you will need an invoice file (billing file), which is a case used exclusively to invoice other cases (but which does not itself contain services).

Set Up

Create a new case and give it a name such as "BILLING FILE". Select the invoice defaults in the case settings and set the case to "invisible" in the Timesheet.

Next, place the cases which will be invoiced collectively under the invoice file, using the key combination "CMD" + "Right arrow". These indented cases are now subordinated to the invoice file.

Invoicing

Your staff will enter their services in the corresponding cases, as usual. When it's time to send the invoice, transfer all services to the billing file, using the command "Transfer from subordinated cases". We recommend that you use the case names in the title row. You can now create the collective invoice from the invoice file. You can easily structure the service lists by subordinated cases.

Warning: If you're using title rows, do not attempt to reorganize services in the invoice file. You will mix up the services from the various subordinated cases and will not be able to create a list sorted by subordinated cases.

A3. How Can I Organize Incoming Emails?

If you're using timeSensor LEGAL's email interface, you can feed emails directly into the system by sending them to the archiving inbox. The interface will recognize all emails which contain the case number and automatically assign them to the correct case.

Emails that the interface could not automatically assign will be displayed in red in the inbox. This FAQ entry will show you how to manually assign these emails:

  • Open the email that you want to sort and click on the small plus button on the right.
  • In the selector window, choose the client and other contacts to whom you wish to assign the email. You only need to select the address and to click on "Accept". You can also drag & drop the contact into the address line of the email window.
  • If you've selected several contacts without cases, you have to drag the contact which contains the case to the first position. It will appear in bold.
  • Once you've assigned a client, you can select the case in the next window, as well as add an archive and key words for archiving.
  • Click "OK" to finish the assignment and archive the documents in the case.

Tip: If you need to assign several emails in a row, use the small round arrows to navigate from one email to the next without closing the window.

A35. How Can I Manage My Presence Time With timeSensor LEGAL?

timeSensor LEGAL is not a time stamp clock, but it can register when employees log in and out of the system. You can use this to monitor your staff's presence time and help with time recording in the time sheet.

Setup

Ask your staff to log in timeSensor LEGAL when they start work and to log out during lunch breaks. Further, request that presence time and entries in the time sheet have to be balanced at the end of the day. In order to use the feature, you need to enable "Presence time monitoring" in the account of every user who is going to use the new feature:


Monitoring Presence Time

Once presence time monitoring is set up, you can open a sidebar in the time sheet by clicking on the arrow at the top right of the window:


timeSensor LEGAL will automatically add presence time at the bottom of the sidebar according to every user's login and logout times. The last figure is "0:00", which means that the user is still logged in and the presence time continues to run.

Total presence time is displayed with a blue bar. The green bar shows the time entered in the time sheet. If the user has spent the whole day at work, the blue bar's length should correspond to the green bar's. This indicates that the user has entered all her hours in the time sheet.

The difference between the blue and the green bar is shown in the red bar. The difference bar will grow with every additional minute of presence time and will diminish with every entry in the time sheet. One particularly useful feature is the ability to transfer the difference, i.e. the time that has not been billed, with one click directly into the time sheet.

A34. How Can I Speed Up the Case Creation Process?

It takes time to manually set up a case due to the numerous parameters. To save time and improve consistency, it is advisable to use template cases and/or template clients.

What Is a Template Case?

A template case is a case with preset parameters to use as a template for new cases. New cases will require little configuration. All parameters will be transferred to a new case, including linked contacts and other data from the template case:

  • Notes
  • Appointments, deadlines and reminders
  • Templates
  • Documents

You can add a template case to any dossier, e.g. the dossier of a key client. You can also create a dedicated dossier which you will use only for templates. This is called a "template client".

What Is a Template Client?

A template client is a client with a preconfigured set of cases, including all parameters, which can be used as a template for new cases. A template client can have as many cases and subcases as you wish. That way, you can take over an entire case structure with one click and save yourself a lot of manual configuration work. A template client works just like a template case. All parameters, including linked contacts and other data, are transferred to the new case.

How Can I Set Up Template Cases and Clients?

First, create a dedicated dossier for templates. This is your template client. The dossier can be in any area. We recommend placing it in the "Staff" area, because access rights to this area are limited. Setting up template cases and clients should be done by your program administrator.

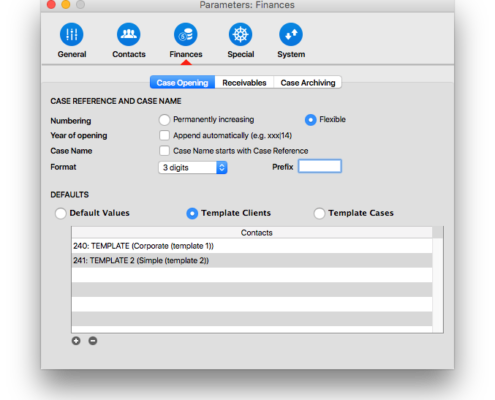
timeSensor LEGAL will only recognize template cases and offer them in the selection if they are marked as such. You can specify this in the parameters (Settings area), under "Finances", by clicking on "Template Client". Open the selector with a click on the "+" button, then select your template cases with the usual drag and drop. This is what it will look like in the above-mentioned example:


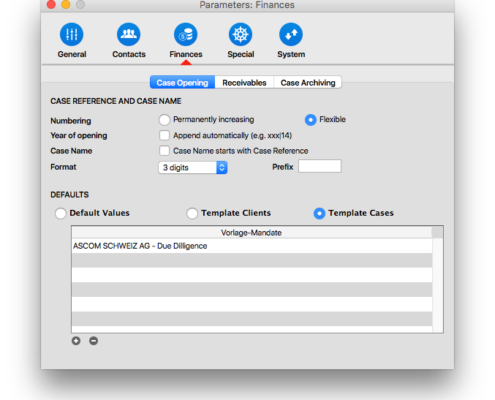
If you only want to add one template case, which does not necessarily need to be in the template client's dossier, then click on "Template case". Add a line with the "+" button and type in the first letters of the dossier in which the case is located:


What are Default Settings?

You can enter default settings for your cases by clicking "Default settings". timeSensor LEGAL will fill in these settings in new cases, if you do not have template cases or clients (or do not wish to use them). timeSensor LEGAL may choose between:

  • the default settings or
  • the settings from the current client's most recent case

You can specify which settings timeSensor LEGAL should use in the menu "Create according to".


Create a New Case

When you create a new case and have set up template cases or template clients, timeSensor LEGAL will show you a list of templates. Just choose the template you want from the list. The new case will be added to the dossier.

In our example, we could add an entire M&A case structure to our dossier "Ivan Kaufmann" with just a few clicks:

If you do not select a template and skip this step, timeSensor LEGAL will create a case with either the default settings or the settings from the current client's most recent case.

A16. How Can I Provisionally Invoice Services With Partial Invoices?

In every case, you can create as many partial invoices for your client or third parties. Partial invoices will be deducted from the final invoice, just like retainer invoices.

It is recommended to use partial invoices:

  • when you do not know exactly how much the final invoice will be
  • if you are uncertain whether to apply your hourly or standard rates
  • if third parties are carrying some of the costs
  • if you want to present your client with a total invoice at the end of the case

You can create partial invoices based on a lump sum or invoice services entered in the dossier using the feature "Partial invoice from selection". In both cases, the partial invoice will show up in the invoice list with a green icon.

Example: Monthly Invoice for Services

  • To invoice all services provided in the previous month, select them in the dossier, then choose the option "Partial invoice from selection" in the action menu
  • This will create a partial invoice. All invoiced services will remain visible with a green marking.
  • The following month, just select the services that have not yet been invoiced and proceed as usual
  • At the end of the project create a final invoice by selecting "Invoice" in the action menu. All services will be invoiced, including the ones with a green marking. However, partial invoices will be deducted.
  • Hint for German law offices: If you decide at the end to invoice according to RVG principles, you will have to delete the services in the dossier (use the grey minus button) and create an RVG invoice using the RVG window.

A28. How Can I Transfer a Case From One Client to Another?

You may wish to transfer a case from one dossier to another:

  • because you entered the case in the wrong client's dossier
  • or because you want to assign the case to another entity within a corporate group

As long as you have not done any booking or invoicing in the case, you can simply transfer it with drag & drop from one dossier to the other. Any linked data such as services, drafts, documents, etc. will be transferred automatically.

If you have already done some bookkeeping or invoicing, you will have to close the case in the old dossier and create a new one with the new client. You will have to transfer data manually from the old case to the new case.