B1. How Can I Delete and Restore Contacts?

You can delete contacts by clicking on the bin under the contact list. If there are cases under this contact, you first need to archive them before deleting the contact.

Deleting a contact will not remove it completely from timeSensor LEGAL. A deleted contact can still be found in and restored from the Crypt.


Restore Deleted Contacts

Go to settings, the select "Advanced" from the "Admin" menu. Click on "Crypt". Select the documents you wish to restore and click "Recover". The contact will be restored and will show up again on your contact list.

B5. How Can I Add a Language?

timeSensor LEGAL allows you to set up as many languages for your firm as you wish. These are languages that your firm will use to communicate with clients, to send invoices and other documents.

Each additional language will increase administration and maintenance efforts for translations and templates.


Adding a Language

To add a language, go to "Settings", then click on "Core Data" and choose "Languages". The window will show existing languages. Just click the "Plus" button to add a language.


Use the dialog box to enter the parameters for the new language:

  • Name: enter the new language's name
  • ISO 639-1 Code: choose the new language's ISO 639-1 Code
  • Translation Web Site: you can enter a reference translation website. You can access this website from your time sheet to create a translation.
  • Salutations: you can set up the salutations for men, women and legal entities. Salutations must be entered fully to guarantee consistency in your address book.


Update Translations

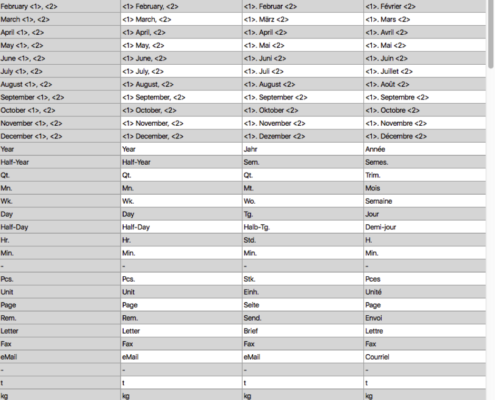
When you add a new language, you must remember to update the translation spreadsheet and translate all expression into the new language.

  • Go to "Settings", then click on "Core Data" and choose "Translations". Translate all expressions in the spreadsheet into the new language.
  • You also need to add the necessary translations to all entries which appear on invoices or in the general communication, in particular:
    • Service groups
    • Services
    • Price list
    • Executive levels
    • Countries
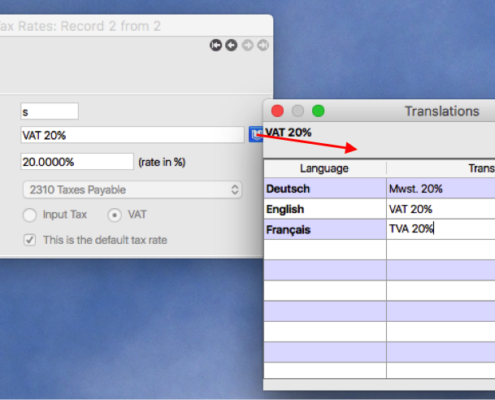
    • Tax rates

You will find a blue translation icon next to the text fields of these entries. Use it to enter translations for the new language.

  • Last but not least, add all templates used by your firm in the new language.


Bottom Line

Before adding a language, make sure that you really need it. After you've added a language, you will need to spend a fair amount of time to update and maintain it. Once this is done however, you will be able to use timeSensor LEGAL with every language you want.

B6. How Can I Update the Court File in timeSensor LEGAL?

In Germany, the courts' addresses and locations are managed by a central federal office in Baden-Württemberg. timeSensor Ltd has subscribed to updates and regularly passes them on to its clients. You can download the newest version of the court file here.

The file is compressed and has to be unzipped before use. MacOS X users can simply double click on the file. Windows users should use an app such as "WinZip". Please ask your IT support if you don't know how to unzip the file.


Install the Update

You will need administrator rights to install the update.

Go to "Settings". Under "Admin", select "Advanced", then click the "System" icon.

Choose "Install Update", and select the newest version of the court file.

The database will be updated, which may take a few minutes. Please do not interrupt the process!

Mistakes

Any mistakes in the file should be communicated directly to the central federal office:

Oberlandesgericht
Gemeinsame DV-Stelle Justiz
Projektgruppe A
Zentrale Entwicklungs- und Pflegestelle für das automatisierte gerichtliche Mahnverfahren
Olgastr. 5
70182 Stuttgart
Tel. 0711 212 4141
og-datei@olgstuttgart-dv.justiz.bwl.de

B7. How Does timeSensor LEGAL's Email Interface Work?

timeSensor LEGAL's email interface lets you archive emails, including attachments, by using a specific, dedicated POP3 email account.

  • Outgoing emails are sent as BCC (blind copies) to the POP3 email account.
  • Incoming emails can be forwarded or transferred to the POP3 email account.

timeSensor® LEGAL will regularly fetch the emails, convert them to PDF and archive them including their attachments.

Hint: Before you activate timeSensor LEGAL's email interface, please read through the FAQ entries, "What format should I use to archive emails?" and "What is the best way to transfer emails into the archive?"


It is only advisable to activate the email interface on the 4D server for occasional email archiving.

Setup

  • Create a dedicated POP3 email account on your email server or with your email provider. This account will be used exclusively for email archiving.
  • Enter the POP3 account details in the parameters, so that timeSensor LEGAL can communicate with the email server and get new emails.
  • Click "Connect" in your inbox window to get emails manually or setup an automatic background task.
  • timeSensor LEGAL will get new emails and show them in your inbox. Emails will be assigned automatically to corresponding cases provided that the case number can be found in the correct format.
  •  Finally, the email will be converted to PDF and archived in the case with all its attachments.


Restrictions to the email interface

  • The email interface is designed to work under Mac OSX. The interface can be activated on the 4D server, on a Mac Client or on a single user version of timeSensor LEGAL.
  • We advise against activating the email interface on the 4D server if
    a) the daily number of emails exceeds 50
    b) you notice a slowdown in your system when emails are being processed
    c) you notice that the interface stops responding when emails are being processed and stops the 4D server from working properly. Unexpected emails can be those with an unusual or wrong code, damaging code, or incorrect font and HTML instructions (often spam).
    In those instances, we recommend activating the interface on a separate Mac Client to improve performance and stability.
  • The maximal file size for emails (including attachments) is 15 MB. Larger emails will be denied in the inbox and you will be notified with a ticket.
  • We cannot guarantee that all coding in emails will always be processed correctly. Some special characters may not be implemented correctly; the interface may crash and the software may need to restart.
  • The current version of 4D Internet Commands supports file names up to 62 characters. The interface cannot process attachments with file names longer than 62 characters.
  • The email interface was developed and tested for selective email archiving. If you process all your emails through the interface, this may cause your system to slow down. In this case, you should not set up the interface on the 4D server, but on a Mac Client.
  • Incoming emails will be converted to PDF. PDF documents will not contain all metadata from the original email. For compliance purposes, you need to keep a copy of all emails on your email server.

Setting up the interface on a separate client will increase stability and performance of your system.

B8. What Is the Best Method to Archive Emails?

There are different techniques to archive emails in timeSensor LEGAL. You have to take two aspects into consideration. The first is the format: Each format comes with a number of advantages and disadvantages. The second aspect is practicality: Email clients will offer different levels of comfort while using one or the other technique.

This article discusses the advantages and disadvantages of each technique, assess their compatibility with current email clients and offer a step-by-step guide for each of these clients.

Archiving Techniques

1. Drag & Drop from Email Client to timeSensor LEGAL Archive

Advantage: easy, intuitive and fast
Disadvantage: Email will be archived in the client's native format (e.g. .eml or .msg file)
Will only work with email clients that support drag & drop to third-party applications.

2. Drag & Drop to Desktop, then Drag & Drop to timeSensor LEGAL Archive

Advantage: easy, intuitive and will always work
Disadvantage: Email will be archived in the client's native format (e.g. .eml or .msg file); this technique involves more steps and will be more time-consuming
Supported by all current email clients on all operating systems.

3. Saving Emails in Drop Folder with Automatic Archiving

Advantage: There is no need to open the case file or dossier to archive emails
Disadvantage: Email will be archived in the client's native format (e.g. .eml or .msg file)
Supported by: Apple Mail, Outlook for Windows, Thunderbird.
Not supported by Outlook:mac 2011, Outlook for Mac 2016.

4. Forward Selected Emails to timeSensor LEGAL Email Interface

Advantage: Emails are archived as PDF
Disadvantage: Emails are modified (archives forwarded emails)
Supported by all current email clients on all operating systems.

5. Redirect Selected Emails to timeSensor LEGAL Email Interface

Advantage: Emails are archived as PDF; emails are not modified prior to archiving (redirect will not show on emails)
Disadvantage: none
Supported by: Apple Mail, Outlook 2007 for Windows, Outlook 2016 for Mac

6. Redirect All Emails to timeSensor LEGAL Email Interface

Advantage: Emails are archived as PDF; emails are not modified prior to archiving (redirect will not show on emails); archiving is consistent and complete
Disadvantage: Higher maintenance as unwanted  emails and spam will have to be deleted manually; no selection of important and less important emails; email communication can burden the server, slow down the database and decrease its stability (please read the FAQ entry on timeSensor LEGAL Email Interface).


Assessment of Current Email Clients

Apple Mail

In general: Apple Mail is preinstalled on Mac computers. This client supports saving and redirecting emails and is therefore the recommended client for archiving emails on a Mac.
Supported archiving techniques: 1, 2, 3, 4, 5, 6

Outlook:mac 2011

In general: Entourage's replacement for Mac is not very capable and does not keep up with Apple Mail or Outlook for Windows. Important features such as saving and redirecting emails are missing.
Supported archiving techniques: 1,2, 4

Outlook 2016 for Mac

In general: Works much like Outlook for Windows.
Supported archiving techniques: 1, 2, 4, 5, 6

Mozilla Thunderbird

In general: Thunderbird is Mozilla's free email client. It is clear and easy to use. Thunderbird supports saving emails. To redirect emails, you will need a plug-in, which adds dependency on third-party products.
Supported archiving techniques: 2, 3, 4

Outlook 2007 for Windows

In general: Microsoft Outlook is state of the art for Windows. Outlook supports saving and redirecting emails. Using it can sometimes be quite complicated.
Supported archiving techniques: 2, 3, 4, 5, 6

Outlook 2016 for Windows

In general: Microsoft Outlook is state of the art for Windows. Outlook supports saving and redirecting emails. Using it can sometimes be quite complicated.
Supported archiving techniques: 1, 2, 3, 4, 5, 6


Step-by-Step Guide

Apple Mail

Use the "Redirect" feature in the "Message" menu to redirect emails. For optimal comfort, we recommend to add the button "Redirect" to Apple Mail's standard toolbar:


Right click on the toolbar, then select "Customize Toolbar..." from the menu.

Drag & drop the "Redirect" button to the toolbar, e.g. next to the existing "Forward" button.


B9. How Can I Create Additional Fields?

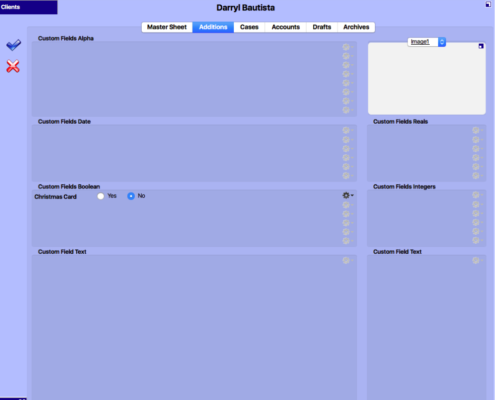
You can create additional database fields in the tab "Additions" of the dossier. For example, you can specify who at your firm should sign the Christmas card. You can also indicate if a client should get an invitation to the end of the year cocktail or receive the newsletter.

The tab "Additions" in the case settings also lets you add additional fields for your cases. For example, if your firm deals with trademarks, you can use these fields to help you manage those trademarks (registration date, deadlines, etc.).


A new field in the dossier will be available and useable in all your contacts. The same goes for new fields in your case settings.

Create Additional Fields

You will need administrator rights to create new fields. Otherwise, you may only use, but not create, such fields. Additional fields are arranged according to their types:

  • Alpha fields may contain up to 255 characters
  • Date fields are designed for dates
  • Boolean fields are Yes/No or True/False fields
  • Decimal number fields may contain numbers with decimals
  • Integer fields may only contain numbers without decimals
  • Text fields can contain longer texts

Click on an action menu to create a new field. The editor window to set up the field will depend on the type of field.

  • Field Definition
    Give a name to the field, and add a colour if desired.
    Define the field length and a default value. You can also specify if all users may modify the properties of the field.
  • Choice List
    If you have a choice list, you can enter it here and force users to choose a value from the list.
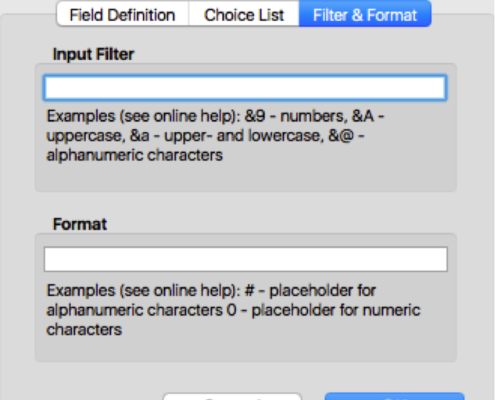
  • Filter & Format
    Precisely define the types of entry that you can make.

Click OK to confirm your changes. The field is now active and can be used. You can always access the field settings and make changes or delete it. Please note that if you delete a field, all information it contains will be lost.

Use Additional Fields

Additional fields work just like normal fields. They will appear in your search menu and you can add them as a separate column on your lists.


B10. How Do I Create a Drop Folder?

A drop folder will help you archive documents in timeSensor LEGAL. Just drop a document in the drop folder and timeSensor LEGAL will automatically import it into your spooler. If you drop the document in a case folder within the drop folder, it will be automatically archived and will show up in the case folder.

Set Up a Drop Folder

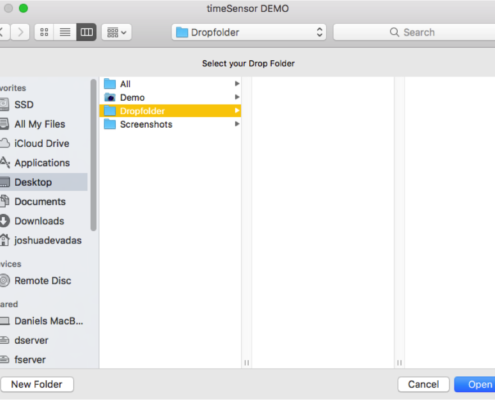
In your spooler, go to "In", then click on "Drop Folder" and select "Set Drop Folder..." Choose an existing empty folder or create a new one. This folder will be your drop folder. Choose "Open", read and accept the warning regarding documents in your drop folder.

timeSensor LEGAL will automatically add one folder for every client in this drop folder, as well as one folder per active case with the clients' folders.

This folder structure within your drop folder will be updated by timeSensor LEGAL. If you create a case, a corresponding folder will be added automatically. The same goes if you change a case name. Do not make changes to the folder structure yourself, let timeSensor LEGAL manage it.

Use a drop folder

A drop folder is your "Entrance door" to archiving with timeSensor LEGAL. The software will constantly look for new documents in your drop folder. timeSensor LEGAL will import every new document in your spooler and delete the original file in your drop folder. Only add copies to your drop folder to avoid losing data.

  • timeSensor LEGAL will ignore documents that you add to the first folder (the drop folder itself).
  • timeSensor LEGAL will import documents in a client's folder to the spooler. The newly important document will be red so that you can assign it to the right case manually and archive it.
  • timeSensor LEGAL will import documents in a case folder to the spooler and archive it directly in the corresponding case.

Examples

A drop folder can help you manage scanned documents. Scan the document, then save it in the right place in your drop folder. A good scanner will even send documents directly to the drop folder.

A drop folder can also be useful to archive emails. Save your emails from your email client directly into the drop folder. Please follow the instructions in the FAQ entry on the subject.

Further Advice

Handling a drop folder (structure, search, and import) can use a lot of resources. It is advisable to only set up one drop folder for your network on a shared server. timeSensor LEGAL will then only manage one folder, instead of the many folders your users might add individually.

File name restrictions differ between operating systems. Make sure to use file names that are accepted on all platforms if users in your network have different OS.


B11. What Should I Do at the End of the Year?

Program administrators should make a few updates and changes in timeSensor LEGAL at the end of every year. Here are the most important ones:

Additional Yearly Backup

We recommend that you make an additional backup at the end of the year and save it on a separate data medium. This may be useful for accounting or any other compliance issue. Ask your IT supporter if you do not know exactly how to do this.


Accounting

We advise that you print out the following lists at the end of your accounting year:

To print these templates, go to Addresses - Employees and select the record of your own law firm. Then click on the printer icon at the bottom right and open one of the above templates.

Download these two files and unzip them. Then start timeSensor LEGAL and open the staff list from the contacts area. Then click on the print symbol in the lower right corner. In the newly opened window, select the gear symbol at the bottom left and create a new template according to the above lists.

Click on "Open" under "File" and select the downloaded and unpacked list. Confirm with "OK".

If you have not yet saved these templates, it is important that you save them under Addresses and not in Finance.


Restart Numbering

If your case references should start at 1 every year, make sure to set the number back to 1 before you create the first case of the year. timeSensor LEGAL will take it from there and restart numbering.

If your invoice numbers start with the year, then go to "Settings", "Parameters", "Finances", and open the "Receivables" tab. There, increase the "Next Number" (e.g. 20170001).


If your archiving numbers (reference used for archived cases) should start at 1 every year, you will have to set the number back to 1 when you archive the first case of the year. Some versions of timeSensor LEGAL let you set back that number in the "Case Archiving" tab.


Update Time Periods

For accounting, timekeeping and payroll accounting (Switzerland), you can set up periods within which entries will be displayed and may be modified. To update those periods:

Go to "Special", "Accounting", then select "Settings":


Go to "Special", "Timekeeping", then select "Settings" (Smart Edition upwards):


Go to "Special", "Payroll Accounting", then select "Settings" (Switzerland only, Business Edition upwards):

zeitfenster3

Important

For the three settings shown above, the period of time for which the display is shown should not exceed five years. This means, for example, if you want to open the year 2020 for accounting, then you must set the period from 2015 to 2020.


Update Work Schedules (Optional)

If you monitor your employees' work hours and vacation time with timeSensor LEGAL, you will need to update their work schedules every year. Use the action menu to automatically calculate the workload with your firm's calendar and distribute vacation time evenly throughout the year.

B12. How Can I Set Up the Case Reference Number and Name ("Our Reference")?

Case reference numbers are often a matter of preferences and local customs. You may want a continuous numbering, add the year, or begin each year at 1. timeSensor LEGAL can do all of that.

Go to "Settings", "Parameters", then select "Finances". Under the tab "Case Opening", you will find the following options:


Numbering: Choose permanently increasing if the numbers should continuously increase, year after year. Choose "Flexible" if you want to start at 1 every year.

Year of opening: You can choose to add the year of opening. The separator will be a vertical bar "|".

Case name: You can add the case reference number in front of the case name, which is advisable in larger law offices.

Format: Select the number of digits for your case reference. If you add less than 999 cases a year and start at 1 every year, then three digits will be enough.

Hint: If you make changes to the case reference system, you can choose to automatically update existing cases by using the button "Update existing Cases". 

B14. How Can I Add and Modify Accounts?

This article shows you how to:

  • maintain and update the chart of accounts in timeSensor LEGAL
  • set up an ISR payment procedure (Switzerland)

In General

timeSensor LEGAL comes with a set of pre-defined accounts which are used for accounting. You may want to modify the account numbers to match your chart of accounts. We recommend that you make sure that the pre-defined accounts have numbers that match your chart of accounts.

If you want to use timeSensor LEGAL for all of your accounting (cash and bank accounts), i.e. including expenses, you will need to add to following accounts to your chart of accounts:

  • all important asset and liability accounts on your chart
  • all expense accounts on your chart

Hint: You can change account numbers at all time, without interfering with your existing bookings. Existing bookings will automatically use the new account number.


Open your chart of accounts

Go to "Special", "Accounting", then choose "Chart of Accounts".

Add or modify accounts

Use the plus button to add accounts or double-click an account to make changes. The editor has up to three tabs, depending on your settings.

Import Chart of Accounts

Instead of manually adding each individual account, you can also import accounts from a chart of accounts. You will learn how to do this here.


Tab "Settings"

Enter the account number according to your chart of accounts under "Account No.". You may not choose an existing number. Enter a name under "Name", then select the account type from the drop-down menu. You can choose between "Assets", "Liabilities", "Revenue", "Expense", and "Opening/Closing". You can enter a starting balance for your balance sheet accounts (assets and liabilities).


Tab "Ledger"

Assets and liabilities accounts can also be set up as ledgers. You can book "ledgers" directly with timeSensor LEGAL. They will show up under "Ledgers" in the "Finances" area. These are usually your petty cash account, bank accounts and postal chequing accounts. You can also set up ledgers for your company's credit cards.

Check the box "Serves as Ledger", then set up your account and fill out the fields. Under "Publish in these Areas", you can choose which users should have access to the account. Users with access will have a red mark. You can set up an employee's credit card as an account in his area so that this employee can book his expenses directly. Enter a prefix and number under "Manual Document Prefix and Next #". timeSensor LEGAL will use these numbers for every booking.


You can also choose a colour for the layout of the account. Click on the white box and select the colour from the chart. This colour will be used for this specific ledger and will make it easier to recognize it in lists and charts.

Finally, for accounts that your clients will use for payments, enter the account information that will be printed on the invoices. This text can automatically be added to your invoice templates with a 4D expression.


Tab "ePayment"

To enable electronic payment with your bank, you need to enter some specific settings. At this time, only the ISR payment procedure for Switzerland is implemented in timeSensor LEGAL. You can set the horizontal and vertical position of the ISR number on your print template. Follow the instructions at the end of this tutorial. Our new GUI allows to precisely choose the position of your ISR number on the template:


The following tutorial explains how to set up and use the ISR payment procedure. It is aimed at law offices in Switzerland: