A26. How Can I Make Sure That My Invoice Numbers Are Compliant With Regulations?

As long as an invoice is saved under "unprinted invoices" it will be considered a temporary draft. If you delete the invoice, its number will be released and reassigned to the next invoice. Therefore, you can always delete a draft invoice and recreate it: the assigned number should remain the same.


Delete or Credit an Invoice?

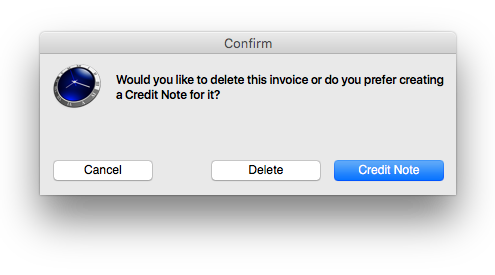
Once an invoice is finalized and saved as "outstanding invoice", its number will no longer be available. If you delete one of these invoices, you can either credit the amount (Credit Note) or delete it. You will see the message pictured on the right.

For transparency reasons, it is often advisable to credit the amount. There may be cases where a credit note does not make sense.

Let's assume you create and send a retainer invoice for a new client. Should this client change his mind and retain the services of another lawyer, you may as well spare the effort of creating a credit note and just discard the invoice.

Even under German compliancy rules, it is not necessary to have a continuous numbering for all invoices. However, each number may only be assigned once.

In the above-mentioned example, in order to ensure internal traceability, you may want to create a PDF copy of the retainer invoice and add it to a case memo. You will find the invoice in your document archive.

You will find more information regarding accounting here.

Modify Invoice Numbers

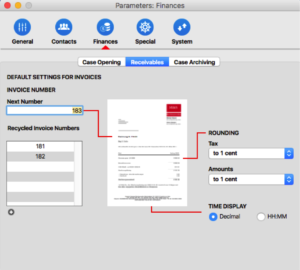
Go to "Settings", "Parameters", then select "Finances". You can modify the invoice number under the tab "Receivables". You may want to increase the starting number if you do not want to disclose the actual number.

You can also access all the "recycled" invoice numbers. Usually, there is no necessity to manage these manually, as timeSensor LEGAL does this automatically.


A27. How Can I Update the Date on an Unprinted Invoice?

Whenever you create an invoice with timeSensor LEGAL, it will first show up in your list of "unprinted invoices". Even invoices that timeSensor LEGAL is set up to create automatically will first show up as "unprinted invoices". If you do not print those invoices immediately but wait a few days before issuing them, it might be useful to update the invoice's date. You can do this directly in the invoice's record. Click on the small lock to unlock the invoice and use the action menu next to the date to enter the new date. Or just update the date directly in the list of "unprinted invoices". Select the invoices for which you want to change the date. Go to "Tools", "Modify selected", then choose "Set invoice date...". This is an easy way to modify the dates of as many invoices as you want.


A30. How Does timeSensor LEGAL Calculate Deadlines for Reminders?

In the receivables, in the list "Outstanding Invoices", timeSensor LEGAL marks invoices for which you should send a reminder with a grey point. This entry explains how timeSensor LEGAL calculates whether or not to display a grey point.


The starting point for the first reminder is the invoice date. You will find this date at the top of the invoice entry. The following screenshots show you how to change the invoice date in an existing invoice, if necessary:

The starting point for subsequent reminders is the date of the last reminder. Provided the next reminder is not outstanding, you may modify the reminder status. For example, you can change the date of the previous reminder or delete the last reminder.

The calculation is based on the current preferences for reminders of the Statement scheme assigned to the invoice. According to these preferences, a defined number of days will be added to the date of the invoice (or the date of the last reminder):


Finally, a tolerance period is added. The default period is five days. Note that if you wish to change this tolerance period, you will need to contact the hotline to make the modification. This specific parameter is not implemented in the GUI.

The short answer to the question is therefore: timeSensore LEGAL will display a grey point when the date of invoices (or the date of the last reminder) plus the payment deadline according to the current preferences for reminders in the Statement scheme assigned to the invoice plus tolerance is smaller than the current date.

A2. What Format Should I Use to Archive Emails?

In General

It may seem advantageous to save emails in the same native format as the one used by your email client (e.g. Apple Mail, Outlook, Thunderbird, etc.). This will create a file that can be opened by your email client. Unfortunately, there is no standard for email file format. The various software uses different file formats; these are the most important ones:

  • .eml - Email message file
  • .msg - Saved email message
  • .rpmsg - Microsoft Restricted Permission Message File
  • .msf - Mozilla Thunderbird mail summary file
  • .emix - Apple Mail mailbox message file
  • .mbs - Opera mailbox file
  • .wdseml - Mozilla Thunderbird mail message file
  • .smd - Mail document or message file, etc.

These are the points to consider if you use the native format of your client to archive emails:

  • Do I work in a mixed network where users who work with different email clients and various operating systems won't be able to open emails archived in native format?
  • Will I still use the same client in 5 or 10 years?
  • Will I still be able to open and read archived emails in 5 or 10 years?

Using the native format of your email client to archive emails may seem like a good and easy idea at first glance, but can be problematic to cooperate with other users or to ensure long-term usability. Furthermore, Spotlight indexing on the database server will not recognize native email format. These emails will not show up in your search results.

Emails in Native Format

If you choose to use the native format to archive your emails, you can select that option when using the drag & drop feature or save your emails in a drop folder.

Dragging emails from your client and dropping them into timeSensor LEGAL will not always work. The email client has to export the files in the right format immediately after the drag and send the link to timeSensor LEGAL. Whether your email client supports this depends on the client, the operating systems and sometimes even on the version of the email client. At the time of creation of the FAQ, drag & drop worked with Apple Mail and Outlook:Mac on Mac OS X Yosemite.

Alternatively, if drag & drop doesn't work, you can save the emails on the desktop and transfer them from there to the archive. This should work with most email clients. If not, you can always use the "Save as..." request of your email client to save emails in a drop folder.

The dropped file (e.g. .eml or .msg) contains the email and all attachments. timeSensor LEGAL will consider it as one single file. It will not recognize the attachments and will not be able to display them separately. In order to view attachments, you will have to open the email file first.

The screenshot above shows an email in an .eml format and a Word file attached to it. The Word file is located within the email file and the attachment is not recognized or displayed by timeSensor LEGAL.

Save in PDF Format

The PDF format has obvious advantages when working with other users or for long-term archiving. PDF documents will also be indexed and will show up in your searches. One way of doing this would be to print every email thus converting it into a PDF and archive it. Considering the number of emails you receive every day, this would take an enormous amount of time.

This is where the email interface of timeSensor LEGAL will be useful: Just send an email to a timeSensor LEGAL POP3 account, and the email interface will do the rest. The email interface regularly fetches new messages, converts them into PDFs and shows them, including attachments, in the inbox. If you've assigned the email to a case, it will automatically be archived there and show up in the corresponding case folder.

The email interface automatically separates attachments from emails. Emails are converted to PDF, but attachments retain their original format and are displayed as attachment in timeSensor LEGAL, as usual.

Archiving using PDF also has its downsides:

Emails archived as PDF will have less evidential value than emails saved in native format. PDF documents will not contain all raw data from the email. The email header contains hidden information about the sender and recipient and technical data regarding sending. This information is invisible in the PDF. It is therefore advisable to retain the original email on your server. You may not need to do something special about it since this is more or less standard today.

Conversion to PDF is complex and does not guarantee a 100% chance of success. You may encounter difficulties with improperly or twice encoded emails, where special characters will not be displayed properly. This problem, though mainly aesthetic, is nonetheless annoying. Emails may also be corrupt or entail damaging code, which may cause the email interface to crash. Finally, emails may simply be too large to be properly converted. In that case, the email will be refused in the inbox and a ticket with a warning will be generated.

Thus: the email interface is useful and reliable, but there will always be a few emails which will not be properly converted.

Conclusion

Whether you opt to archive emails in native format or wish to convert them to PDF using the interface is a matter of preference. Take into consideration the needs of your team, your wish to secure and retrieve documents long term, as well as practical needs. Usefulness of redirecting and saving features vary a lot between email clients . For example, Apple Mail can easily deal with email redirect, whereas the same feature has simply not been implemented in Microsoft's Outlook:mac 2011.

A1. How Can I Find Archived Cases?

Archived cases are hidden. You won't find them in the dossier. In this entry, we will show you how to access or reactivate archived cases:


Case Folders

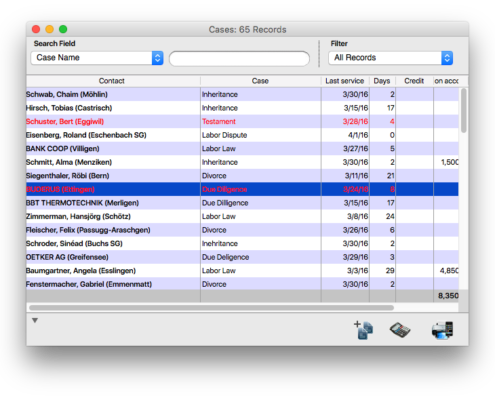
In the window "Find Case Folder", check the box "Incl. archived" to include archived cases in the search. When the box is checked, archived cases will show up on the list. They will appear in red and can be opened - just like all other cases - with a double click.

Thanks to their red titles, archived case folders are easy to spot. When you open the dossier from an archived case folder, the archived cases in the case list of the dossier will also appear in red.

This way, you can easily access and reactivate archived case folders or cases.


Dossier

Hold down the SHIFT key when you open a dossier and go to the "Cases" tab to display archived cases in red in the case list. Now you can open an archived case and convert it into an active case.


Case List

In the area "Finances", hold down the SHIFT key and click the "Cases" button to display archived cases in the list. You can use the search field "Status" to filter and show only archived cases. Select the search field "Status" and enter the value "2". Active cases have a "0", inactive cases a "1" and archived cases a "2" in the "Status" field.


The difference between Inactive & Archived

If you change the status of a mandate to "Inactive", you will no longer be able to work on it. However, it will still be visible in the dossier. Inactive documents can be identified by the fact that the text is greyed-out. Changing the status to "Inactive" pauses the mandate.

On the other hand, setting the status of a mandate to "Archived” will close it permanently and cause it to disappear from the dossier overview. The text of such documents is displayed in red.


A31. How to Copy Paste With timeSensor LEGAL

The copy and paste feature is well-known in text processing. You may not know it, but you can also use copy and paste in timeSensor LEGAL, with a few restrictions.

"Copy" From Lists

Lists in timeSensor LEGAL have a very useful feature: Right-click on the list to reveal the menu "Copy". This feature allows you to copy the selected entries, as shown on the screen, to the clipboard.

You can use this feature, combined with the possibility to taylor lists to your requirements (watch our tutorial A2 in our basic training), easily copy the data you need and import into Excel.


a31eng_01_lists

Copy and Paste Service Entries

You can also copy and paste service entries within the time sheet, as well as between time sheet and dossiers, thanks to a special software feature. Hold down the Alt key while pasting the previously copied service entry and the service will automatically be transferred and adapted to the current case. This will also trigger a new calculation of prices according to the price list attached to the selected case.

Copy and Paste From Cells and Fields 

It is also possible to copy from database fields. Be careful when pasting data from database fields or tables, because text may not always be text.

If you copy sections from a homepage or an HTML coded email, you will also copy control characters and other damaging code into your timeSensor database. This means "Garbage In, Garbage Out": If you save control characters or damaging code into your timeSensor database, you may influence the software. Some hidden characters may for example interrupt printing, resulting in an incomplete template containing only data up to this hidden character. We do not recommend copying data from websites or HTML emails directly into database fields.

A32. How Can I Restore a 4D Write Draft?

Should you encounter a problem while saving a 4D Write draft, e.g. because of a crash or network problem, you may not be able to find the document in the draft folder.

Hold down the ALT key and press the "Plus" button. timeSensor will search the database for incorrectly saved drafts and will restore them, whenever possible.


a32eng_01_recovery

A33. How Can I Add a Spouse in timeSensor LEGAL?

You may add a couple in one single dossier or use separate - but linked - dossiers for each spouse.

Use a Common Dossier for a Couple

It is usually more practical to use a single dossier for a couple. In this case, chose the title "Mr and Ms". If the couple uses the same family name, you can add both first names in the corresponding field:

a33eng_01_same_name

If the family name is different, you can add the spouse in the "Complement" field:

a33eng_02_different_name

Use Separate Dossiers for Each Spouse

In some situations, you may prefer to use separate dossiers for each spouse. You may link the dossiers with an appropriate relation, e.g. "Spouse1 - Spouse2". This method only makes sense if you're not addressing both spouses at the same time.

a33eng_04_spouse2

a33eng_03_spouse1


A29. What Do I Need to Do When an Employee Is Joining or Leaving my Law Office?

This FAQ entry describes what you should consider when employees are joining or leaving your law office. You need administrator rights in order to make the following changes.

Employees Joining

1. Register the Employee's Data

Go to contacts and choose “Employees”. Register the new employee’s address. Tip: select the law office’s file before clicking the plus button. Thereby the new address will automatically be added as an employee. Open the newly registered record, click the “Home” button and add a private address.

2. Add a User Account

The new employee needs a new user account in order to use timeSensor® LEGAL. Go to “Settings”, click the “User”-button and add a new user account. Remember to link the previously added user address in the “User Contact Record” section. The new user needs to be part of at least one group. Otherwise the new record cannot be saved. The groups can be ticked in the “Log In” section. If the employee will be working as an executive, you should also add an icon to the record.

Tip: After creating the new record you can drag and drop the username to the right position depending on the hierarchy. This order will be displayed in the login window.

3. Register an Executive User (Optional)

If the new employee is an executive user, you have to register that in timeSensor® LEGAL. Thus the user gets a personal area in the software. Go to "Settings", click "Core Data" and select "Executives". Click the big, blue plus button to add an executive user. Choose the executive level and tick the desired options. Tip: If you are working with more than one entity you have to repeat this process for every entity in which the new employee is an executive user.


Employees Leaving

1. Assign a Successor

Make sure that there are no more cases or clients assigned to the employee who is leaving. If there are assigned cases you can change these to another employee. Set the filter to the leaving employee and check if she is selected as an executive user in any cases. If so you can change this by clicking “Tools”, “Modify selected” ,“Set Account Manager…”

2. Set the User's Record to “Inactive"

Go to “Contacts”, click “Employees” and open the employee’s dossier. Set the status to “inactive” and save the record. The address will now show up in grey. Alternatively you can also delete the record provided that there is no important information in the dossier.

3. Deactivate the User's Account

Go to “Settings”, click “Users” and open the user’s account. Click “log In” and tick the box “Account Deactivated”. The user will no longer show up in the log in list and will not require a licence.

4. Delete the Executive User

Go to “Settings”, click “Core Data” and choose “Executives”. Delete the leaving employee’s name from the list. Please note that the executive's record will remain in the database, so that the employee's services may still be assigned at a later point. Tip: If you are working with more than one entity you have to repeat this process for every entity in which the employee leaving the firm is an executive user.