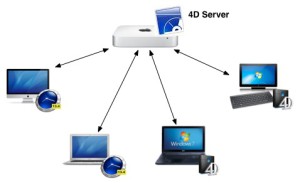
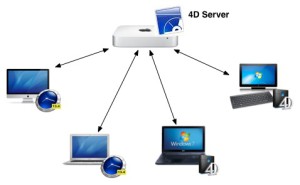
D3. How do I Install the timeSensor Client for Mac?


2381215_orig

In a multi-user environment, every workstation has its own timeSensor LEGAL client. The version of the client must match that of the server. Use our universal installer to install the timeSensor client:

Installer

Installer

Enter your email address before you download. The installer will automatically download and install the newest version of the software.

When using timeSensor LEGAL, the timeSensor Client will continuously communicate with the 4D server. You will need a perfect network connection. If in doubt, test your connection with a PING test. Make sure that all machines, including laptops, are connected with a cable. WLAN connection is not strong enough, and small interruptions will cause the connection between the timeSensor client and the 4D server to fail.

Make sure that the workstation does never go into sleep mode by adjusting the settings accordingly.

Also, check that language and format are selected according to your needs.

  • For the United States of America, the language is "English" and the region is "United States of America".
  • For the United Kingdom, the language is "English" and the region is "United Kingdom".

First Connection to the 4D Server

Start the timeSensor client after installation. In general, the timeSensor client will find the 4D server automatically and the login window will show up.

If the timeSensor client does not find the 4D server, you will be asked to enter the network address of the server in the dialog box. Enter the name of the application ("timeSensor LEGAL") and the IP address of the Mac Min, then hit OK.

The next time you start the client, it will remember the 4D server's IP address and find it automatically.


Pre-configuring the server address

In the case of larger installations, it may be useful to pre-configure the settings of the client application so that it finds the server automatically on the first login. You can install client applications that have been prepared like this on the workstations by using a tool such as Filewave. The IP address of the server can be specified in a text file that is included in the client package. Here’s how to do it:

  • Install the timeSensor client application with the MacOS installer, as previously described
  • Navigate to the installer, right-click on it, and then select "Package contents"
  • You will find the file "EnginedServer.4Dlink" in the package in the directory /Contents/Database
  • Change the file extension from ".4Dlink" to ".txt"
  • Open the text file with a double-click
  • Enter the name of the application (i.e. "timeSensor") after the text "server_database_name="
    • If the network traffic between the server and the client is encrypted, add a circumflex at the beginning, i.e. "^timeSensor".
  • Enter the IP address of the server after the text "server_path="
    • If the database server cannot be accessed through the default port 19813, you can also specify the desired port for the client by adding it to the path after a colon
  • Save the file and change the extension back to ".4Dlink"

D2. How Do I Install the timeSensor Client for Windows?

_9410995_orig

In a multi-user environment, every workstation has its own timeSensor LEGAL client. The version of the client must match that of the server. Follow these links to download the timeSensor client:

timeSensor Client v16 for Windows

Under Windows, install the client in the user's document folder, to make sure the user has full read and write access. Add a shortcut to the taskbar to simplify user experience.

When using timeSensor LEGAL, the timeSensor Client will continuously communicate with the 4D server. You will need a perfect network connection. If in doubt, test your connection with a PING test. Make sure that all machines, including laptops, are connected with a cable. WLAN connection is not strong enough, and small interruptions will cause the connection between the timeSensor client and the 4D server to fail.

Make sure that the workstation does never go into sleep mode by adjusting the settings accordingly.

Virus Scanner/Windows Defender

Please switch off the virus protection for the following paths, otherwise the software will be significantly slower or may not start at all, or shows a malfunction:

  • Path where the Client App is installed
  • Path in which the resources are located

The standard paths are the following:

  • C:\ProgramData\timeSensorProgram\timeSensor Client
  • C:\Users\Administrator\AppData\Local\timeSensor

First Connection to the 4D Server

Start the timeSensor client after installation. In general, the timeSensor client will find the 4D server automatically and the login window will show up.

If the timeSensor client does not find the 4D server, you will be asked to enter the network address of the server in the dialog box. Enter the name of the application ("timeSensor LEGAL") and the IP address of the server, then hit OK.

The next time you start the client, it will remember the 4D server's IP address and find it automatically.


D1. How Do I Set Up a Multi-User Edition of timeSensor®?

2381215_orig

A timeSensor® LEGAL multi-user system consists of a macOS or Windows based server, with 4D database and installed timeSensor software, as well as a number of workstations that access the database server using a generic timeSensor client ("Rich Client").

The more workstations access the server, the stronger the server must be designed. In the download area you will find our white paper with the recommended server configurations, which depend on the size of the law firm.

For small law firms, Apple's Mac Mini may not be as fresh as a daisy, but it is particularly robust and economical. The use of this device greatly simplifies configuration and maintenance.


Download our setup guide below for detailed instructions on how to set up timeBox on a Mac server:

Setup Guide

Setup Guide


As far as Windows is concerned, we recommend using either Windows Server 2016, Windows 2012 or Windows 10 Pro 64-bit as the operating system. It is important to ensure that a separate administrator account is created for the database when operating timeSensor LEGAL under Windows. The account must be a "real" user account with administrator rights (not a system account), and the autostart must be performed with this account.

We generally recommend that Windows installations are carried out by timeSensor AG via remote access.

D11. How Do I Set Up the Starface Interface?

Starface is a VOIP based telephone system that works well on Mac and Windows. Some editions of timeSensor LEGAL come with a built in Starface interface. With this you can:

  • Make phone calls directly from timeSensor LEGAL
  • Trigger automatic actions by incoming calls (e.g. open the case folder)

On the technical side, the connection works through an http communication between your 4D server and the Starface telephone system. You need to activate the 4D module "4D Web Application Expansion" for your 4D server to communicate with the Starface system. Once this module is activated, you can set up Starface.

Firewall

If your Starface server is in the cloud or in a different zone of your network, you need to open the ports 8080 and 8081. The communication between the Starface server and the 4D server goes through these ports. Whenever the Starface server receives a call, it must reach and inform the 4D server. The HTTP request initiated by Starface must be transferred from the firewall to the IP of the 4D server through ports 8080/8081. Please ask your network administrator to adjust those settings.

Enter your external IP and port 8080 in a web browser to see if you can see the 4D web server from the outside. (https://externe-IP:8080)

The following image should then appear:

Setup Part 1

The 4D server must be able to reach the Starface telephone system . For this, you will need Starface's IP address.

  • Use a ping request to check if the Starface system can be reached from the server
  • If that is the case, enter the IP address in timeSensor LEGAL: Go to "Settings", then choose "Admin" and "Advanced"
  • Click on "System" and choose "Starface" in the menu "Technology"
  • If your Starface appliance is located in your local network: Choose "Local" and enter the IP number in the "Starface Server" field
  • If your Starface appliance is located in the cloud: Choose "Cloud" and enter the IP number in the "Starface Server" field. In the field "External Office IP", enter the IP address of your firm


Setup Part 2

You need to add the following information to the user accounts of each user who will use the interface:

  • Autostart: You can enable or disable this feature, which automatically starts the interface at login
  • Inbound Call Action: You can define how timeSensor LEGAL must act when it receives a call and recognize the number. You can choose among the following options:
    • Case or dossier (recommended setting for lawyers)
    • Dossier (not recommended)
    • Business card (recommended setting for assistants)
  • Username: enter the login ID for your Starface account here.
  • Password and Extension: timeSensor LEGAL uses this information to log in the Starface server. Enter your password and login ID for your Starface account, the same ones that you use to log into the Starface Web interface. Your Starface administrator will enter this information in the Starface GUI under "User"; talk to your administrator if you have questions.
  • Important: the username and extension field must be exactly the same.

Using the Starface interface

Once the interface is properly set up, you will see a telephone icon in your command bar when you log into timeSensor:

d11en_06_setup6


The icon is blue when the interface is active. It is grey when the interface is inactive. You can activate the interface by clicking on the icon. If you select the option "Autostart", the interface will be activated automatically after login.

To dial, just click on the telephone icon. You will find the icon in convenient places in the software. Starface will call your extension and dial the selected number as soon as you pick up.