C5. How Can I Add Several Printer Trays?

You want to use specific paper for your invoices? This FAQ entry will show you how to assign different printer trays for various pages of your documents.

In General

Printer drivers are fairly complex. This method will work for many printers, but there is no guarantee that it will work on all printers.

In general, follow these steps:

  • Select the template for which you want to save printer settings
  • Modify the settings
  • timeSensor LEGAL will save your printer settings in a small file along with the template
  • Before printing, timeSensor LEGAL will send the printer settings to the printer, then print the document

There are two (under Windows, three) methods to create printer settings and send them to the printer:

  1. With plain text, i.e. the settings are sent to the printer using commands such as "Choose paper tray nr. 3" or "Print in landscape format"
  2. As Print Record BLOB, i.e. all the settings are saved in one single Print Record and sent to the printer before each print
  3. Under Windows, it is possible to install the driver several times and set each one up. You will have several copies of the same driver, each with its own specificities. One driver will e.g. select tray 1, the other one will select tray 2. In timeSensor LEGAL, just assign the right driver to your templates.

Each method may work better than the other, depending on your printer and OS. The first and third methods work well with Windows, whereas the second method seems to work better under Mac.

Set Up the Printer Settings

Go to the template editor and select the template which you want to make changes to. At the top right, click on "Output Options".

Click on the small printer symbol to use the first recommended method or hit and hold the "alt" key when you click on the small printer symbol to use the second recommended method:


  • Mac OS X
    • Simple click  -> Print Record BLOB (Method 2)
    • Alt + click -> plain text (Method 1)
  • Windows
    • Simple click -> plain text (Method 1)
    • Alt + click -> Print Record BLOB (Method 2)

timeSensor LEGAL saves the printer preferences in a small .txt or .blob file and saves it locally on your workstation. This means that the printer settings will only work on your workstation. In a multi-workstation environment, you will have to set up the printer settings on each workstation.

You can also set up a tray or a printer using the "Printer parameters" button for multi-document templates, such as the invoice template. This way, you can print the invoice, the invoice details and the pay-in slip from different trays or printers.

Tips:

  • You can select each template, but do not have to make the changes in all languages. The printer settings are set up for all language versions of the template.
  • These methods may not represent the steps for each option on each printer accurately. Please refer to your printer support if some options are not available or not rendered properly.
  • Event though you can open Word templates from timeSensor LEGAL, the printer settings for Word are not controlled by TSL. You can only set up printer parameters for Word templates in Word.

Tips for Administrators

If you're using a consistent set of printers throughout your network, you can save time by just copying the printer settings on a USB stick or your server and pasting it from there on all workstations.

timeSensor LEGAL saves the printer settings under this path:

  • macOS: Users/Username/Library/Application Support/timeSensor/STUFF/PRINTERS
  • Windows: Users/Username/timeSensor/STUFF/PRINTERS
    Pfad macOS

Go to the folder and copy the files on your USB key or server. You can just paste the files in the same folder on all other workstations. Before each print, timeSensor LEGAL checks this folder for printer settings and uses them automatically.

Further:

  • The folder "Library" is hidden under macOS. The easiest way to find it is by holding the "alt" key down while selecting "Library" in the "Go to" menu.
  • If you only wish to copy some printer settings, use the template's ID in timeSensor LEGAL. You will find the ID of each template if you open the bottom part of the print options. The ID is shown on the right side of the grey bar. Use the ID to find the corresponding printer settings file in the "PRINTERS" folder.

C4. How Can I Print and Create PDFs without Borders?

Windows

Install a PDF driver that supports borderless PDF documents.

NOTE: A borderless PDF on your screen does not mean that your printer also supports borderless printing. To do so, you will need a printer that supports this feature.


Mac

On Apple computers, you can set up border parameters for PDFs in the print dialog. Because most printers do not support borderless printing, the default parameters on your Mac is with borders. For example, standard A4 pages are created with 2 cm borders on each side. That goes for PDFs as well.

You can create your own paper size to avoid these restrictions. Open the print dialog box, then select "Manage Custom Sizes..." in the "Paper Size" menu to create your own paper size. For a borderless A4 page, choose 210 mm x 297 mm as  paper size and 0 mm of non-printable area on all sides. Look at the screenshots below to see how this is done.

NOTE: A borderless PDF on your screen does not mean that your printer also supports borderless printing. To do so, you will need a printer that supports this feature.

C3. How Can I Set Up a Cloud Drive to Remotely Access my Documents?

It can be useful to keep some documents available at all times. Just take your iPad to court and access all archived documents in a case with it. timeSensor LEGAL lets you add archived documents from selected cases to a cloud directory.

First, choose a cloud service that you like and trust. Then, install the cloud service's software on your server. If you're using a single workstation edition, install the software on your workstation.

In the parameters, go to the tab "Cloud Drive" to identify the cloud drive. Choose "Select..." and navigate to your cloud directory. In a multi-workstation environment, you will see the directories on your server. It is advisable to add a dedicated folder for timeSensor LEGAL in your cloud directory.


Next, open a case folder and click on the Cloud Drive icon.


We recommend that you limit the publication period. timeSensor will then automatically remove documents at the end of the period. If you're mobile and someone at the firm adds a document to the case, this document will show up on your mobile device. At the end of the period, the documents will be deleted from the cloud server.

iPad preferences

Open the cloud app.
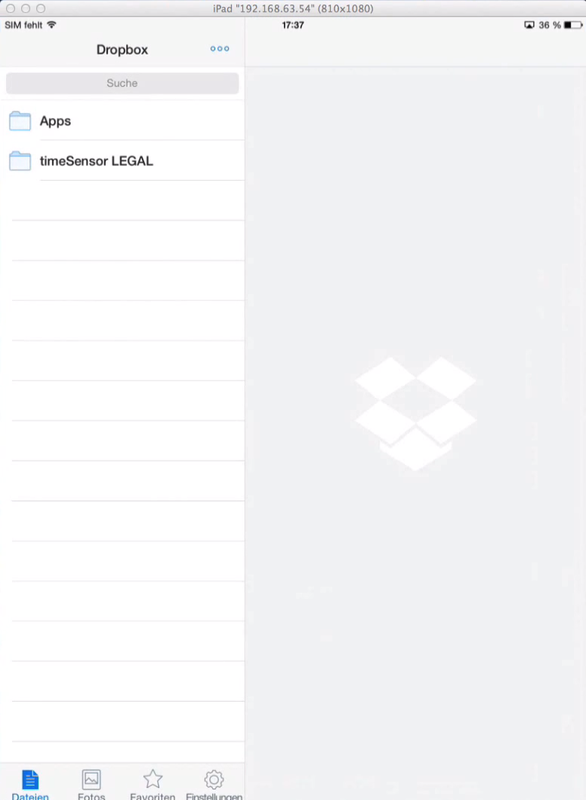
The cloud directory will show up, in which you will find timeSensor LEGAL's folder. Open the folder and you will see the names of the clients for which you have activated cloud sharing.
2093066_orig
 For example, Janina Maier's folder. These documents have been uploaded to the cloud and can now be downloaded, for a certain period of time, on your mobile device.
8842455_orig

C2. How Can I Restart the Mac Mini Server?

You may be able to fix some problem by restarting your Mac Mini Server. Please note that restarting your server will force all users to quit the 4D server and stop them from using timeSensor LEGAL until the 4D server has restarted.

Restart the Mac Mini

To restart the Mac Mini Server, you need to have access to a screen. You can set up access for the administrator with Apple Remote Desktop, VNC, TeamViewer or any other similar program. Normal users should not be able to access the Mac Mini Server.

Make sure that all users are logged out of the 4D server before you restart. You will see a warning, which lets you choose how to log out users. In general, you should select "Wait until all users have logged out". The 4D server will shut down as soon as the last user is logged out.

Now, restart your Mac Mini Server


Restart the 4D Server

In general, the 4D Server application will start automatically when the Mac Mini is rebooting. If that's not the case, go to the program folder, find the timeSensor Folder and double-click on the „timeSensor Server“ application icon.


Hint

The "Autostart.4DLink" file is a shortcut to open the database. It is created every time the database starts and can be deleted.

If your 4D server is the only 4D application on the computer, you can add the file as a "Login Item" in your system preferences, under "Users & Groups". The database will then automatically restart every time the Mac Mini restarts. This will only work if the 4D server is the only 4D application on the Mac Mini.

The Mac Mini is not a workstation. Please do not work on the server. This could impair the functionality of the database or lead to damages in the database.


C1. How Do I Connect to the timeSensor® LEGAL Server? All I Can See is a Tab.

When your timeSensor® LEGAL application does not open automatically, you may see this bar:

4142870_orig

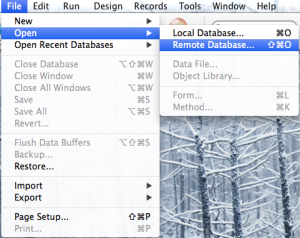
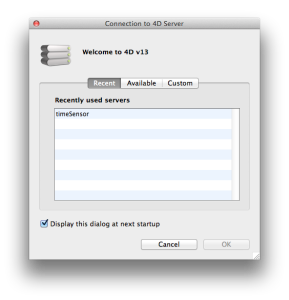
You can access the application with just a few clicks. Go to "File", "Open", and select "Remote Database...". You will see the usual access dialog box to connect to the server. If you've used a connection to the server in the past, you will see it in the tab "Recent". If the tab is empty or the connection fails, try to connect using the tab "Available", or enter the server's IP address under the tab "Custom".

5821659_orig


4424576_orig

C11. Which Versions of Microsoft Word Are Compatible With timeSensor LEGAL?

timeSensor LEGAL can process all types of Microsoft Word documents. It is possible to archive those documents in their native format, or use Word templates with timeSensor LEGAL.

Word Templates Without Data Integration

As long as Word templates do not have to access data from the database, you can use any version of Word. When you click on a Word template, it will be copied in your draft folder and the document will open. Your operating system will now take over and open the program corresponding to the document.

Word Templates With Data Integration

timeSensor LEGAL offers data integration with a plug-in operated via a macro, as is the standard in the industry. The file "timeSensor template.docm" is a Word template with an integrated macro. You can use it to create your own templates for your firm. The template can be downloaded from our page "Download". You can use the template in two different ways:

  • Copy the necessary components (Macro, menu) from the "timeSensor template.docm" into your own template and use placeholders where data from the database should be inserted.
  • Create your own template on the basis of the "timeSensor template.docm" by modifying it according to your needs.

There is no need to install additional components into Word. You may wish to enable all macros if you do not want Word to ask for permission each time you open a template. Just go to Word settings under "Security" (or the "Trust center") and check the option "Enable all macros".

There are many different versions of Word for both Mac and Windows. The following list shows you under which versions of Word the "timeSensor template.docm" can be used:


Modify/Create
template

Execute template
(from TSL)

Word
2007 (Windows)

Yes

Yes

Word
2008 (Mac)

No*

No*

Word
2010 (Windows)

Yes

Yes

Word
2011 (Mac)

Yes

Yes

Word
2013 (Windows)

Limited**

Yes

Word
2016 (Mac)

Limited***

Yes

Word
2016 (Windows)

Yes

Yes

* Word 2008 for Mac does not support additional components coded with VBA (Visual Basic for Application).
** Word 2013 is not operated in the same way by all Windows computers. You may encounter issues when creating template depending on your configuration.
*** Word 2016 for Mac does not (yet) support individualized ribbons. The timeSensor Add-In ribbon can only be used in a limited way. Furthermore, you cannot insert placeholders in the template. However, this feature is available in the "Sendungen" tab under "Seriendruckfeld Einfügen". You can use all the features of the "timeSensor template.docm", but you will have to switch back and forth between the ribbons "add-in" and "Sendungen".

C12. Is It Possible to Directly Drag & Drop from the Volume of a Server?

Server volumes may be connected to the file system with different protocols (AFP, SMB, FTP, etc.). Whether or not it is possible to drag & drop files located on the server volume directly into timeSensor LEGAL will depend on this protocol.

Under Mac OS X, the server volumes from which you wish to drag & drop files from into timeSensor LEGAL should be connected with AFP protocol. If that is not the case, you will need to copy the files on the desktop first and archive them from there.

If you do not know under which protocol your server volumes operate, select the volume, then go to "File" and select "Get Info". In the information window, you will find the information you are looking for right next to the server's IP address. You may consider asking your IT administrator to connect the server volume with AFP.


C14. Which Window Scaling Is Supported by timeSensor LEGAL?

New Windows laptops often have a very high screen resolution (e.g. 3840 x 2160 pixels) and a relatively small screen size (e.g. 13 or 14 inches). For this reason, items under native display will appear very small, sometimes even impossible to read.

Windows uses a trick: Open "Control panel", then click "Appearance and Personalization" and "Display". You can now change the size of items. Only use the recommended display settings. Do not "set a custom scaling level", which is explicitly not recommended by Microsoft.


C9. Is Time Machine Suited to Back Up the Server?

Apple launched its backup software Time Machine with Mac OS X 10.5. It is integrated in the operating system of every Apple computer. We advise not to use Time Machine on your server for the following reasons:

  • Time Machine does not allow setting a timeframe for backups. The software may start backing up data when every user is logged in and the system is running at full capacity. This could slow down the server.
  • Time Machine only saves data sets. The criteria for saving data is whether it has been changed since the last backup. The 4D Server saves data in one big file which is changing all the time. Time Machine will therefore keep trying to back up this file.
  • Furthermore Time Machine will not succeed in backing up the database because it cannot be backed up while it is in use. Users are continuously using and changing the data that Time Machine is trying to back up. In addition the cache is storing data which has not yet been transmitted to the hard disk.

It is mandatory to back up the 4D database with the 4D backup function. This ensures a complete copy of the files. Please configure the 4D backup function so that it starts every night, e.g. at 2 am. It is unlikely that users will be logged in at that time and the system will have enough capacity. This backup is your primary backup and it is saved on the same machine (but preferably on another hard drive) as your productive database.

The backup file should then be copied to another hard drive which should be located outside the law office. This copy can be made using tools like Carbon Copy Cloner. It is important that you check this secondary backup regularly and that it is located outside your offices.

C10. Program Layout in Mac OS X vs. Windows

timeSensor® LEGAL is an application using Multiple Document Interface (MDI). This graphical user interface allows the user to open multiple documents within the application. These documents are displayed in child windows within the parent window. The child window can be freely moved within the parent window.

Mac OS X allows the user to freely move the child windows across the desktop. The parent window has been reduced to the menu bar at the top of the display. This creates the illusion of transparency.

In Microsoft Windows child windows can only be placed within the parent window. The parent window covers the desktop. The shortcut Strg+tab allows the user to switch between different windows. By default, the parent window is opaque and covers the desktop. Alternatively, you can set the parent window to transparent. You can activate that setting by clicking on the window icon in the menu bar.